5 Best Tips to Change Mini Excavator Tracks Yourself?

Time:2026-05-03 Author:Sienna
0%

Changing mini excavator tracks can seem daunting, but it is a rewarding task that many operators choose to undertake themselves. According to a report by the Association of Equipment Manufacturers, nearly 40% of operators do their own maintenance. This not only saves costs, but also enhances their skills. Expert mechanic John Smith emphasizes, “Learning how to change mini excavator tracks by yourself builds confidence and reduces downtime.”

The ability to perform this task can help operators work more efficiently. High-quality track replacements can lead to better machine performance. However, many underestimate the importance of the right tools and safety procedures, leading to potential accidents or machinery damage.

It's essential to approach this task with care. Understand the specific requirements for your mini excavator model. While the process may seem straightforward, mistakes can be costly. Always prepare properly and ensure you have all necessary materials ready. In the end, knowing how to change mini excavator tracks by yourself is a valuable skill that enhances your overall expertise in machinery management.

5 Best Tips to Change Mini Excavator Tracks Yourself?

Understanding Mini Excavator Track Systems and Components

Understanding mini excavator track systems is essential for any operator. The tracks play a vital role in the machine's performance. They provide stability and traction, especially on uneven surfaces. Knowing the components of the track system helps in identifying issues. The primary components are the tracks themselves, sprockets, idlers, and rollers.

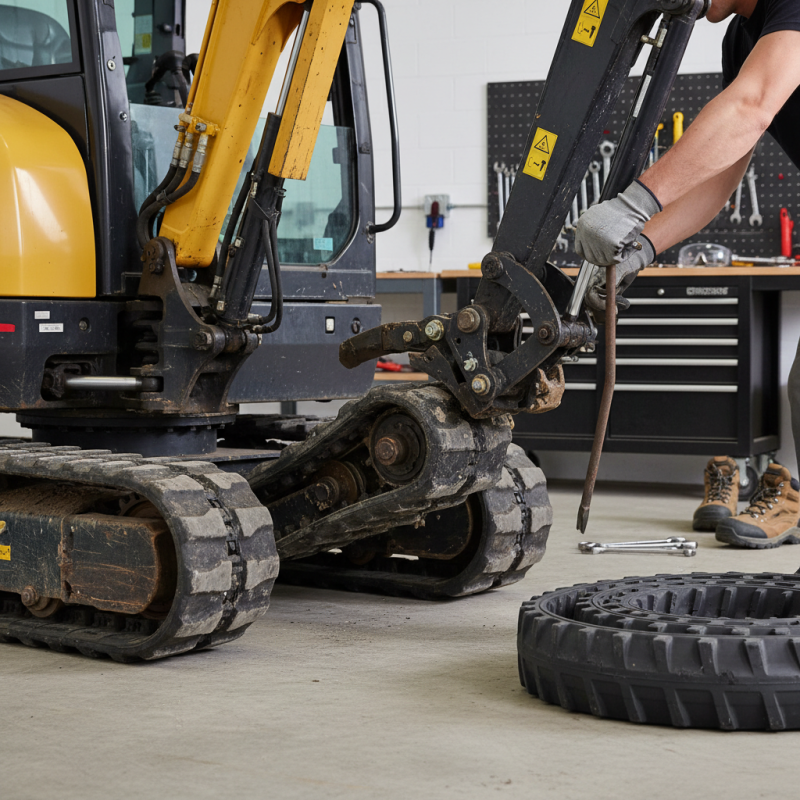
When changing the tracks, it's important to have the right tools. A jack, wrenches, and safety gear are essential. Always refer to the mini excavator’s service manual for specific guidelines. Tips include: measure your existing tracks to ensure proper replacement. If they show wear, it might be time to replace them even if they aren't broken.

It’s advisable to inspect the entire track system for wear and damage. Look out for missing or damaged bolts. Ensure the tension is correct. Too loose or too tight can lead to further problems. Don't rush the process. Take your time to get it right. This diligence can prevent costly repairs later.

Essential Tools and Equipment for Changing Mini Excavator Tracks

Changing mini excavator tracks can be a challenging task. However, having the right tools and equipment makes a significant difference. Basic tools include a wrench set, a jack, and track removal tools. These are essential for loosening bolts and lifting the excavator. It might be helpful to have a friend assist you during the process. Another vital piece of equipment is a track tension gauge. This ensures proper tension after the new tracks are installed.

One tip for success is to carefully inspect the undercarriage before starting. Look for signs of wear or damage. This will help you identify if other repairs are necessary. It can be tempting to rush through the job, but taking the time to prepare can save you from future headaches.

Additionally, always keep safety gear nearby. Gloves and goggles are a must. You might think they are optional, but accidents can happen quickly. Lastly, take notes of what works and what doesn’t as you change the tracks. This reflection helps improve your technique for future projects. Even experienced operators learn something new with each change.

Step-by-Step Guide to Safely Removing Old Tracks

When replacing mini excavator tracks, safety is paramount. Begin by gathering necessary tools, including a jack, track puller, and sockets. According to industry reports, improper removal can lead to significant equipment damage or personal injury. Ensure the excavator is on stable ground and that you have proper personal protective equipment, such as gloves and safety glasses. A stable setup prevents accidents during the process.

Next, raise the excavator using a jack. Confirm the machine is level and securely supported. After detaching the bolts, gently use a track puller to remove the old tracks. Many operators overlook the importance of regular inspections. Maintaining tracks in good condition can extend their life by up to 35%. Check for wear and tear on both the tracks and rollers. While tasks like this may seem simple, attention to detail is crucial.

Once the old tracks are off, cleaning the undercarriage is essential. Debris buildup can negatively impact the performance of new tracks. Verify that all components are functioning correctly before installation. This process may take time and patience, but it is vital for ensuring the efficiency of your mini excavator. Avoid rushing, as haste can lead to mistakes and unforeseen issues.

How to Install New Tracks on Your Mini Excavator Correctly

Installing new tracks on a mini excavator is essential for optimal performance. Proper installation affects both safety and efficiency. According to a report by the Association of Equipment Manufacturers, over 20% of mini excavator issues stem from track problems. When changing tracks, ensuring the tension is just right is crucial. Too tight can cause premature wear while too loose can lead to track slippage.

Begin by safely lifting the excavator and removing the old tracks. Inspect the rollers and idlers for wear. This can impact track longevity. Use a torque wrench to ensure all bolts are tightened to the manufacturer's specifications. This step is often overlooked, but it can prevent future mechanical issues.

Finally, take your time during the installation. Many professionals note that rushing can lead to mistakes. For instance, failing to align the track properly can result in dragging or uneven wear. Check for any signs of misalignment after the first few hours of operation. Regular inspection post-installation is key to a successful upgrade.

5 Best Tips to Change Mini Excavator Tracks Yourself

Tip Number Tip Title Description Tools Required
1 Gather Necessary Tools Ensure you have all required tools on hand before starting the job. Socket Set, Wrenches, Pliers
2 Prepare the Excavator Park the mini excavator on a flat surface and ensure it is securely turned off. N/A
3 Lift the Excavator Use a jack to lift the tracks off the ground for easier access. Hydraulic Jack
4 Remove Old Tracks Carefully unbolt and remove the old tracks from the excavator. Socket Set, Wrenches
5 Install New Tracks Align the new tracks with the sprockets and secure them in place. Socket Set, Torque Wrench

Maintenance Tips for Prolonging the Life of Your Excavator Tracks

Maintaining your mini excavator tracks is crucial for their longevity. Regular inspection is essential. Look for signs of wear or damage, such as cracks or loose components. Frequent checks can help catch issues before they escalate. Take time to clean the tracks regularly, removing mud and debris that could cause wear.

Proper tension of the tracks is another key factor. Too tight or too loose can lead to premature damage. Check the manufacturer's guidelines for tension specifications. Without proper tension, the tracks may wear unevenly. Lubrication is also vital. Use the correct lubricant to ensure smooth movement and minimize friction.

Track alignment should not be overlooked. Misalignment causes uneven wear and can damage the undercarriage. Regular adjustments might be needed. Keeping the excavator on stable, level ground during use can prevent unnecessary pressure on the tracks. Over time, these practices can greatly extend the life of your excavator tracks. Careful attention to detail will pay off in the long run.

FAQS

: Why is understanding mini excavator track systems important?

: The track systems are vital for stability and traction, especially on uneven surfaces.

What are the main components of a mini excavator's track system?

The primary components include tracks, sprockets, idlers, and rollers.

What tools are necessary for changing tracks?

Essential tools include a jack, wrenches, and safety gear for protection.

How can I ensure proper track replacement?

Measure the existing tracks carefully and inspect for wear before replacement.

What should I do if the tracks are worn but not broken?

Consider replacing them anyway to avoid future complications in performance.

How should I check the track tension?

Ensure the tension is not too loose or too tight to prevent further issues.

What are common mistakes during track installation?

Rushing the process or failing to align the track can cause uneven wear.

How can I maintain mini excavator tracks for longevity?

Regular inspections for wear, cleaning debris, and checking tensions are crucial steps.

Why is lubrication important for tracks?

It ensures smooth movement and minimizes friction, reducing wear on components.

What happens if I overlook track alignment?

Misalignment can lead to uneven wear and damage to the undercarriage over time.

Conclusion

Changing mini excavator tracks by yourself can be a rewarding task that saves you both time and money. To successfully complete this process, it’s essential to first understand the mini excavator track systems and their components. Equipped with the right tools, you can move on to a step-by-step guide for safely removing the old tracks. Ensure you follow the correct installation procedures for new tracks to avoid potential issues down the line. Additionally, incorporating maintenance tips into your routine will help prolong the life of your excavator tracks, ensuring optimal performance throughout their usage. This comprehensive approach will make you confident in how to change mini excavator tracks by yourself, enhancing your machinery maintenance skills.

Sienna

Sienna

Sienna is a skilled marketing professional with a deep expertise in our company’s core products and services. With a passion for innovation and detail, she plays a pivotal role in crafting insightful blog posts that not only highlight the unique features of our offerings but also provide valuable......